Creating and Configuring Disciplines on Fitofan
Step 1: Accessing the Form
Open your Fitofan Platform dashboard.
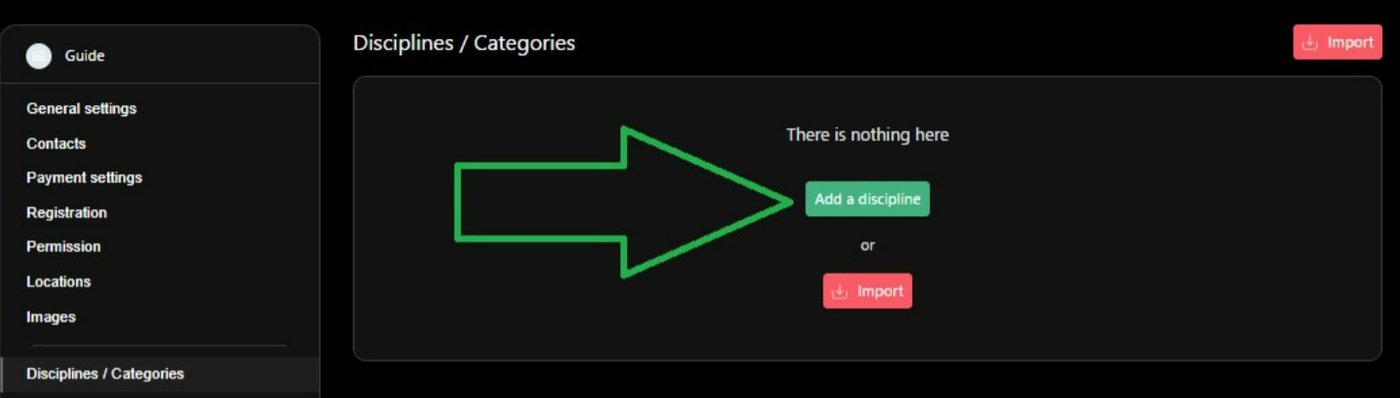
In the left-hand sidebar menu, click on the Disciplines / Categories tab.
Click the green "Add a discipline" button located in the center of the screen (or use the pink "Import" button in the top right to reuse an existing template).
Step 2: Filling out the Form Fields
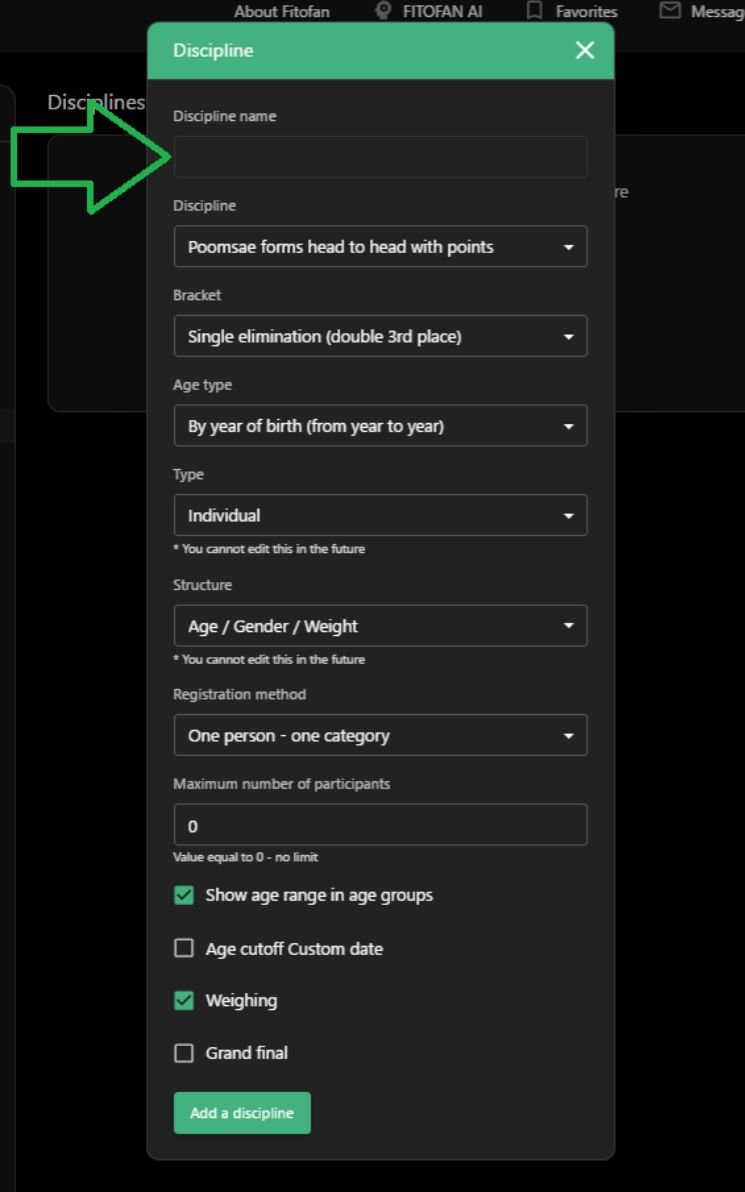
1. Discipline Name
Field: Discipline name
Explanation: This is the public name of the discipline. It will be visible to everyone on the registration page and on the main page of the competition. Make it clear and recognizable for participants (e.g., “Taekwondo Kyorugi”, “Kickboxing Light Contact”, or “Karate Kata”).
2. Selecting the Judging Rules & Scoreboard
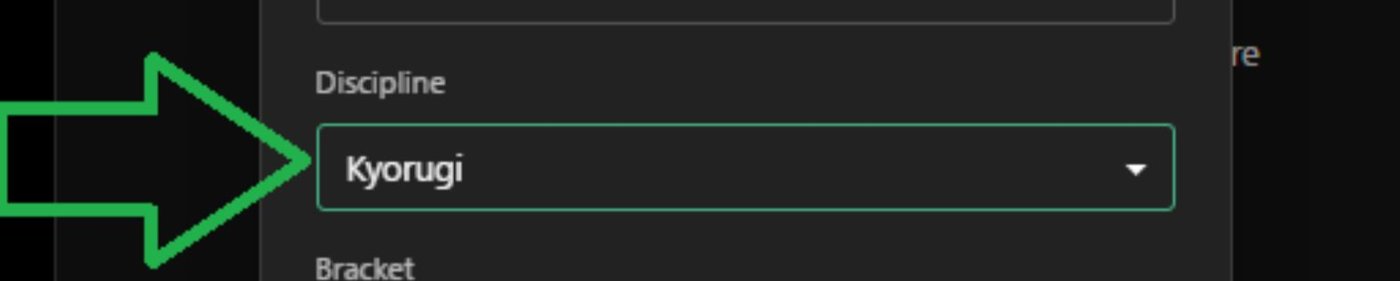
Field: Discipline
Explanation: In this dropdown, you select the specific judging rules and the scoreboard system that will be applied to this entire discipline. Options include various martial arts and performance scoring mechanics (e.g., Poomsae forms head to head with points, Kyorugi, Simple forms with judges).
3. Bracket / Tournament Tree System
Field: Bracket
Explanation: This defines the default bracket type that will be used for this discipline.
Note: This is just a base setting. If needed, you can later change or customize the bracket type individually for any specific category within this discipline. Available types include Single elimination, Double elimination, and Round robin.

4. Age Type Classification
Field: Age type
Explanation: Choose how the system filters and groups athletes by age:
By year of birth (from year to year): Groups athletes strictly by their calendar birth years (e.g., 2012–2013).
By age (from age to age): Groups athletes by their specific numerical age (e.g., from 14 to 15 years old).

5. Participant Type
Field: Type (⚠️ Critical: This setting cannot be modified after saving)
Explanation: Choose between Individual (for solo athletes or 1v1 matchups) or Group / Teams (for synchronized team forms or team relays).

6. Category Hierarchy Structure
Field: Structure (⚠️ Critical: This setting cannot be modified after saving)
Explanation: It is crucial to select the correct division structure here, as it defines how registration sub-categories are automatically split. Choose based on your sport's needs:
Age / Gender / Weight: Use this for combat disciplines where athletes are divided by age, gender, and weight classes.
Age / Ranking / Gender / Weight: Select this if you also need to separate athletes by skill levels, such as belts or experience tiers.
Age / Gender or Age / Ranking / Gender: Choose these configurations if weight is not factored into the competition (standard for various forms, patterns, or kata events).

7. Registration Rules & Limits
Field: Registration method
One person - one category: Restricts an athlete to registering in only one division within this discipline.
One person - many categories: Allows a single athlete to multi-register across different weight classes or skill levels.

Field: Maximum number of participants
Keep this set to 0 for unlimited registrations. Enter a specific integer if you need to hard-cap the entry pool.

Step 3: Additional Settings (Toggles)
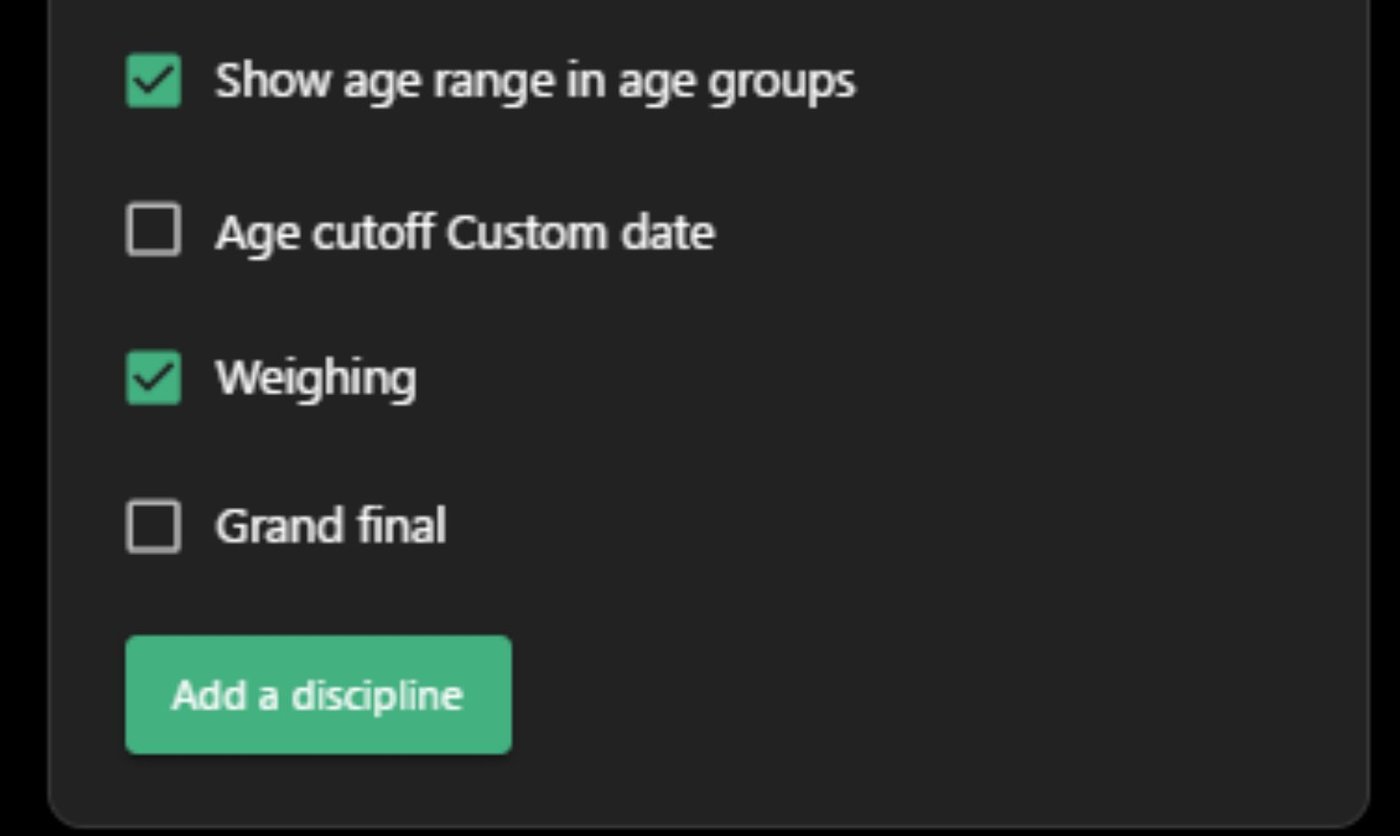
[ ] Show age range in age groups: Check this to visibly display minimum and maximum age criteria during the public user registration process.
[ ] Age cutoff Custom date: Check this if your tournament uses a non-standard deadline for age verification.
[ ] Weighing: Enable this checkbox if your discipline requires athletes to pass an official physical weight check prior to competing.
[ ] Grand final: Specific discipline to add winners of different categories into special Grand Final Division.
Step 4: Finalizing Creation
Once all fields match your tournament regulations, click the green "Add a discipline" button at the very bottom of the window to deploy the category.
📖 Guide: Building the Category Hierarchy (Age, Rankings, and Weights)
Once your base discipline is created, you need to build out your tournament categories. The system will strictly follow the structural hierarchy you selected during setup (e.g., Age / Ranking / Gender / Weight).
Here is the exact step-by-step workflow to configure your divisions efficiently and use built-in duplication features to save time.
Step 1: Adding the Age Group (First Level of Structure)
Because your chosen structure starts with Age, the first step is to establish your age groups.
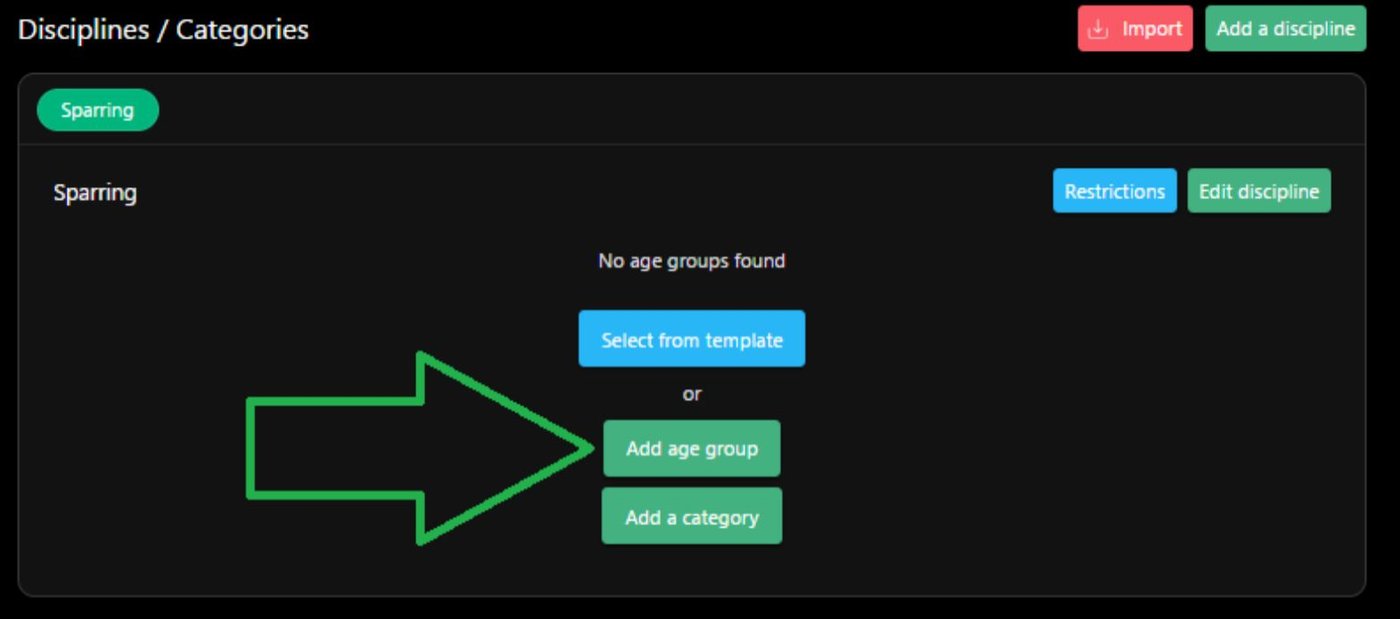
Click the green "Add age group" button (or click "Add a category" if no groups exist yet).
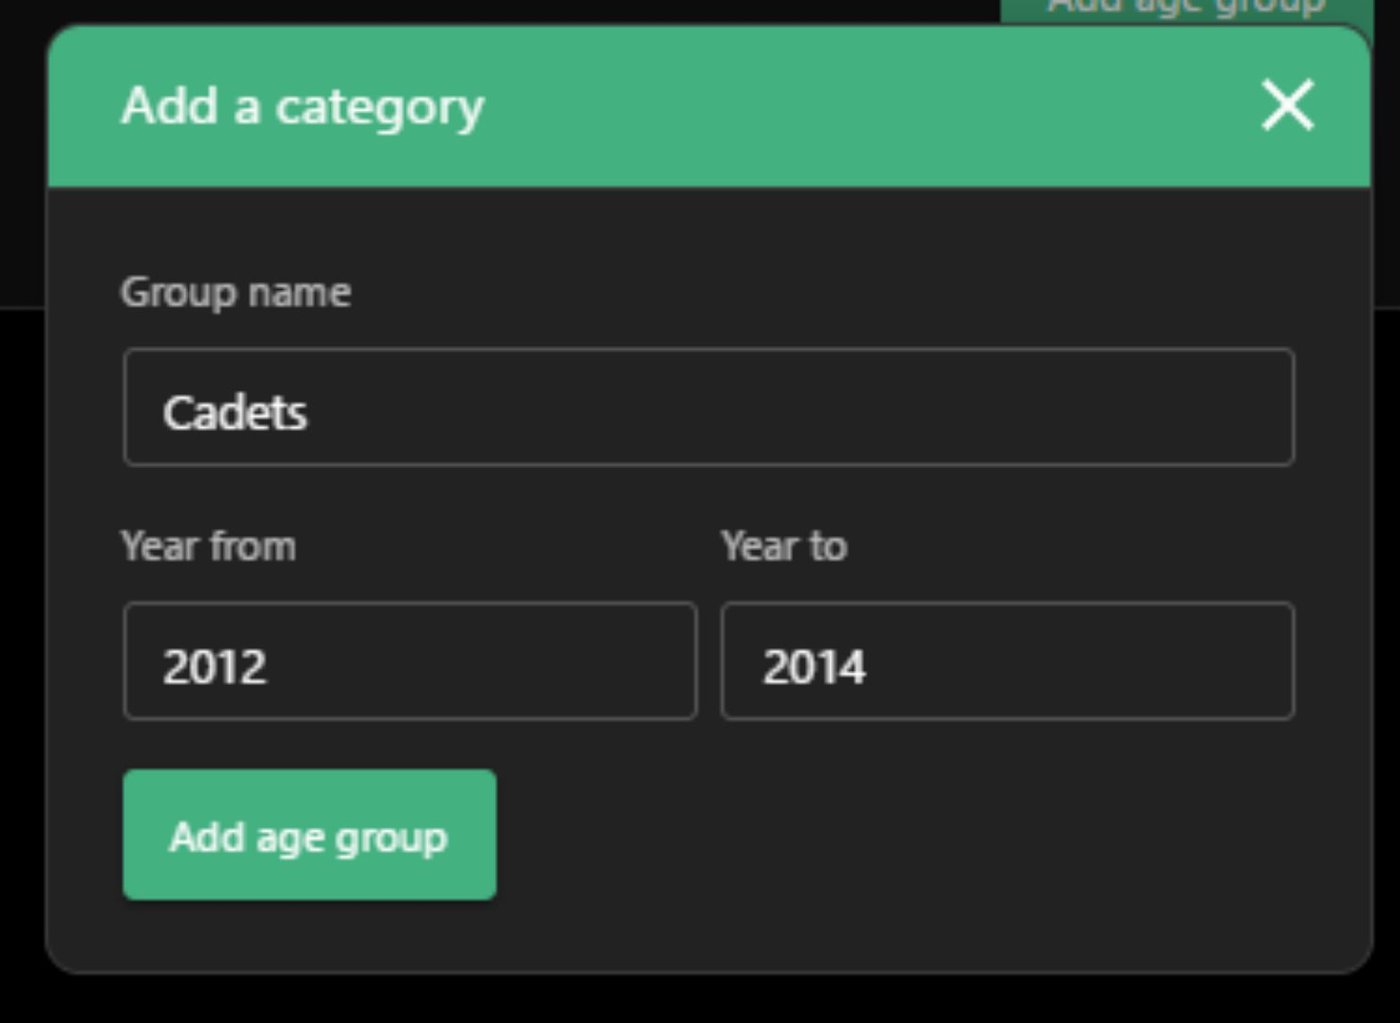
Group name: Enter the name of the division (e.g., “Cadets”).
Year from / Year to: Enter the year matrix limits (e.g., 2012 to 2014).
Click the green "Add age group" button to save.
Step 2: Adding Rankings / Belts (Second Level of Structure)
Now that your age group is active, you must configure the Ranking parameters under it.
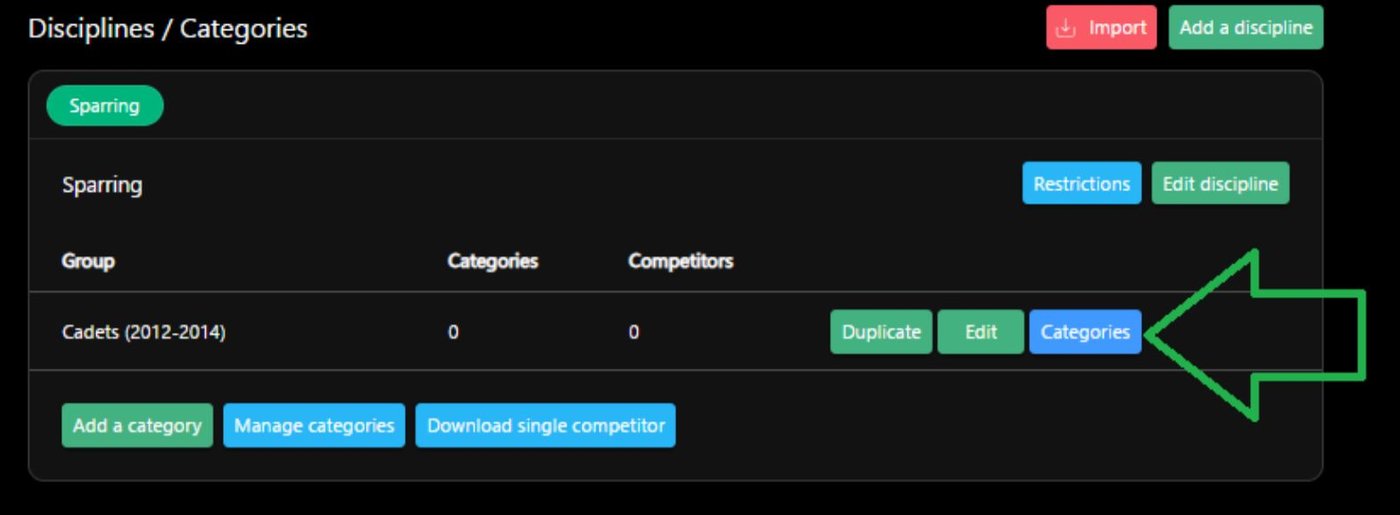
In the main list, find your new age group (e.g., Cadets (2012-2014)) and click the blue "Categories" button on the right.
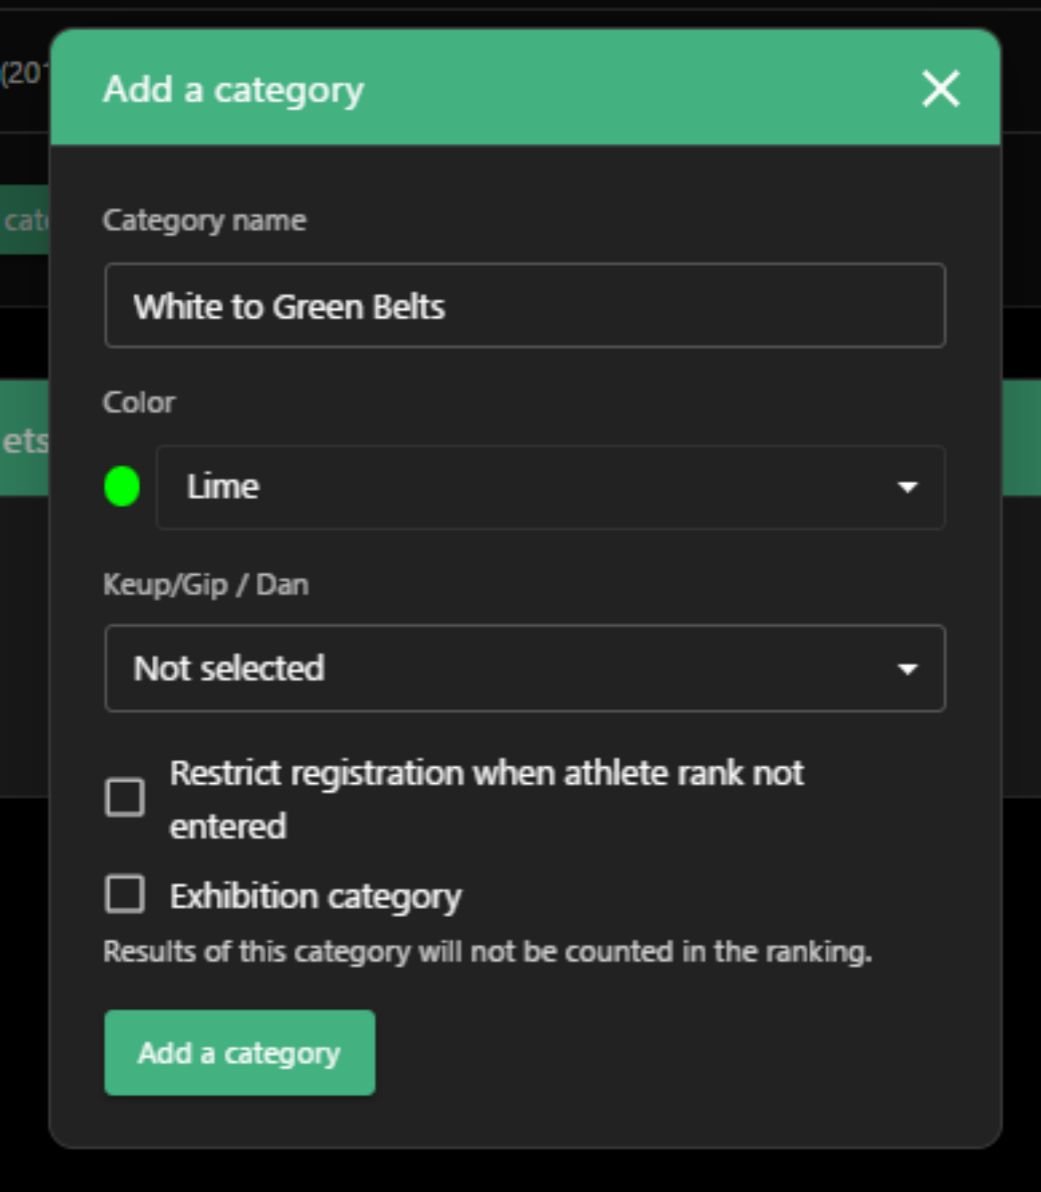
In the modal popup window, click the blue "Add a category" button.
Category name: Type your skill or rank group name (e.g., “White to Green Belts”).
Color: Select a visual color identifier from the dropdown menu (e.g., Lime).
Click "Add a category" to save.
Step 3: Configuring Gender & Weight Sub-Divisions (Third & Fourth Levels)
Fitofan simplifies the process by automatically splitting your gender classifications.
Click the green pencil icon (Edit) next to your newly created ranking category.
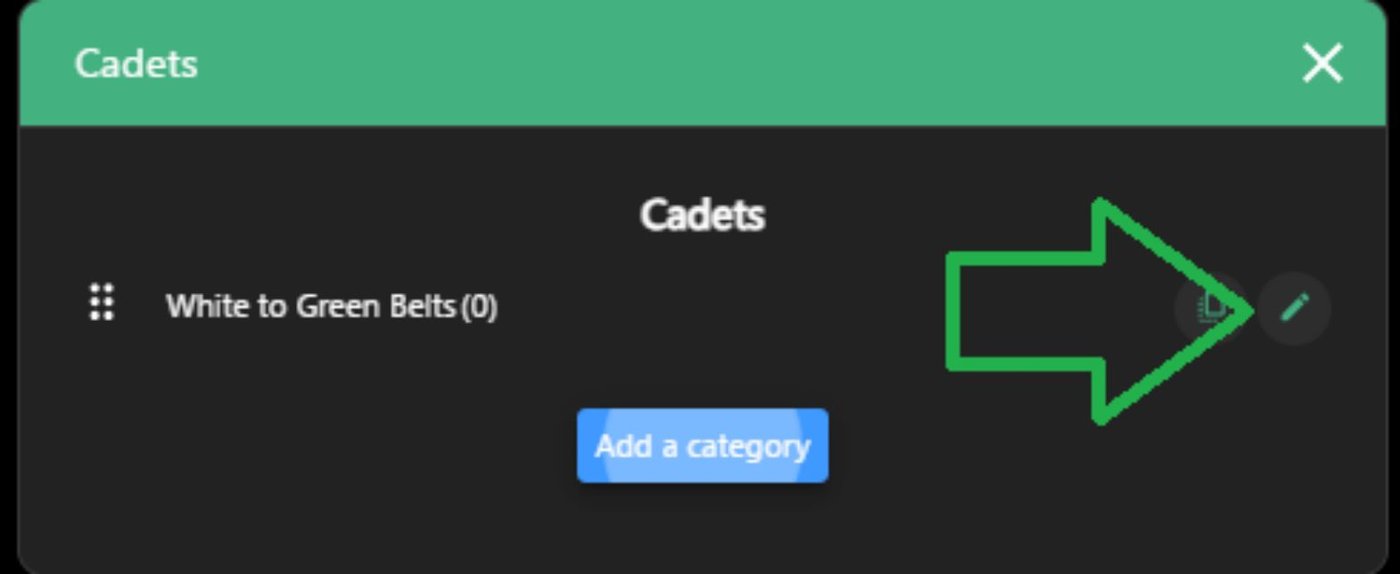
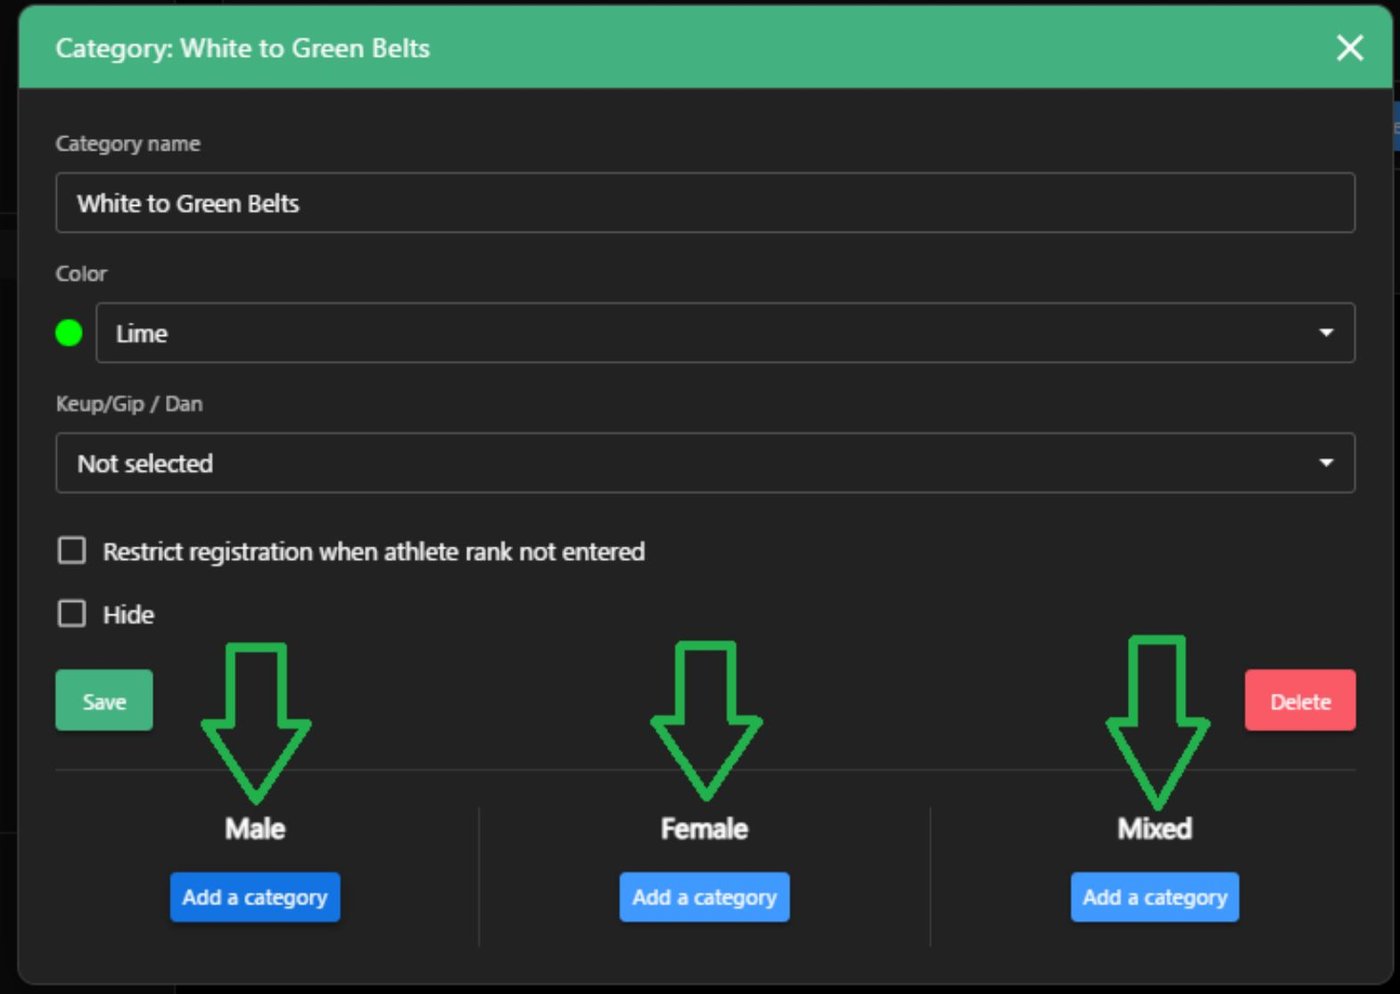
You will see that Fitofan has automatically generated three columns: Male, Female, and Mixed (for co-ed divisions).
Under the chosen gender column, click the blue "Add a category" button to start creating individual weight classes.
Category name (Weight): Enter the weight class display name (e.g., -55 kg).
Weight restrictions (optional): Click one of the predefined Presets tags or type custom numerical fields into Weight from (kg) and Weight to (kg).
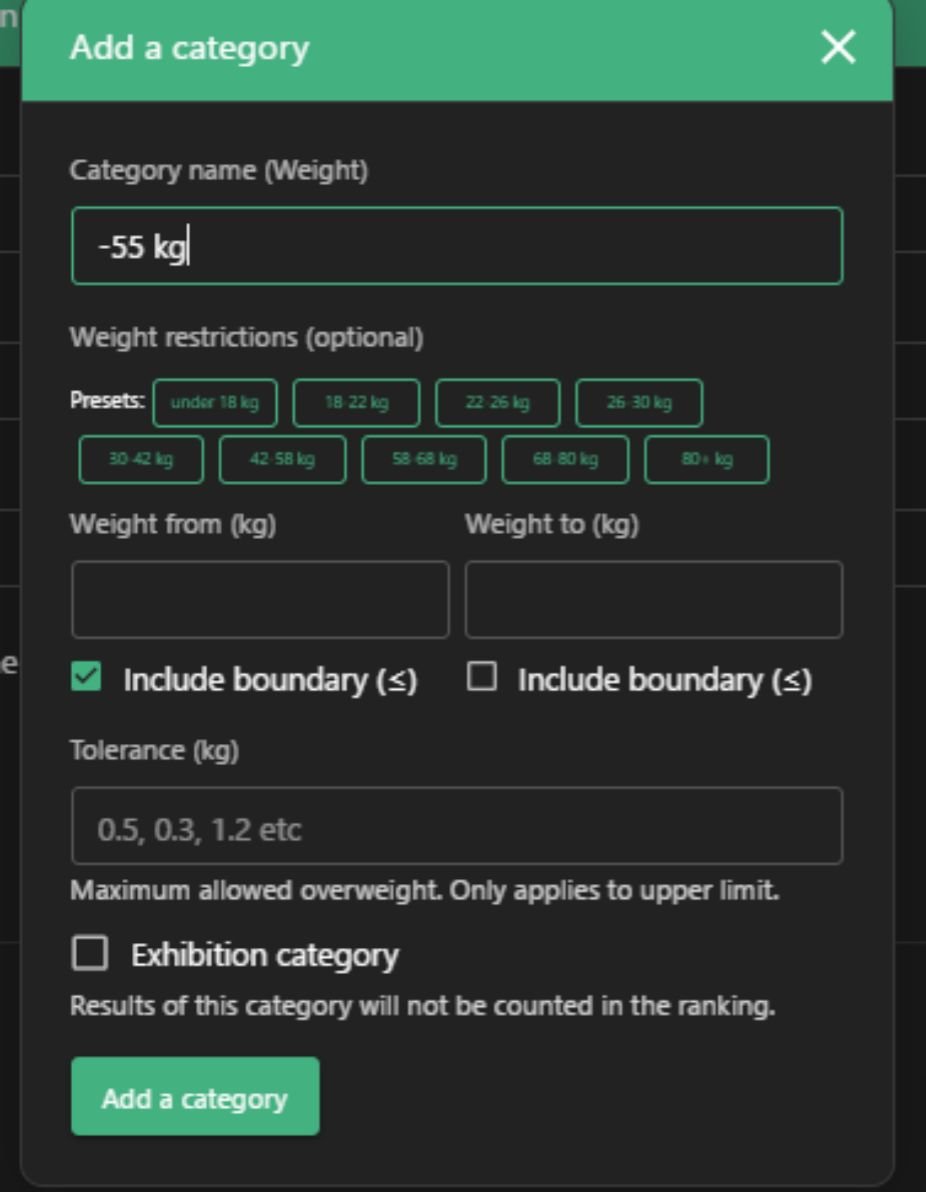
Tolerance (kg): Enter the allowed weight cut buffer (e.g., 0.5) for official weigh-ins.
Click the green "Add a category" button. Repeat this step for all remaining weight divisions.
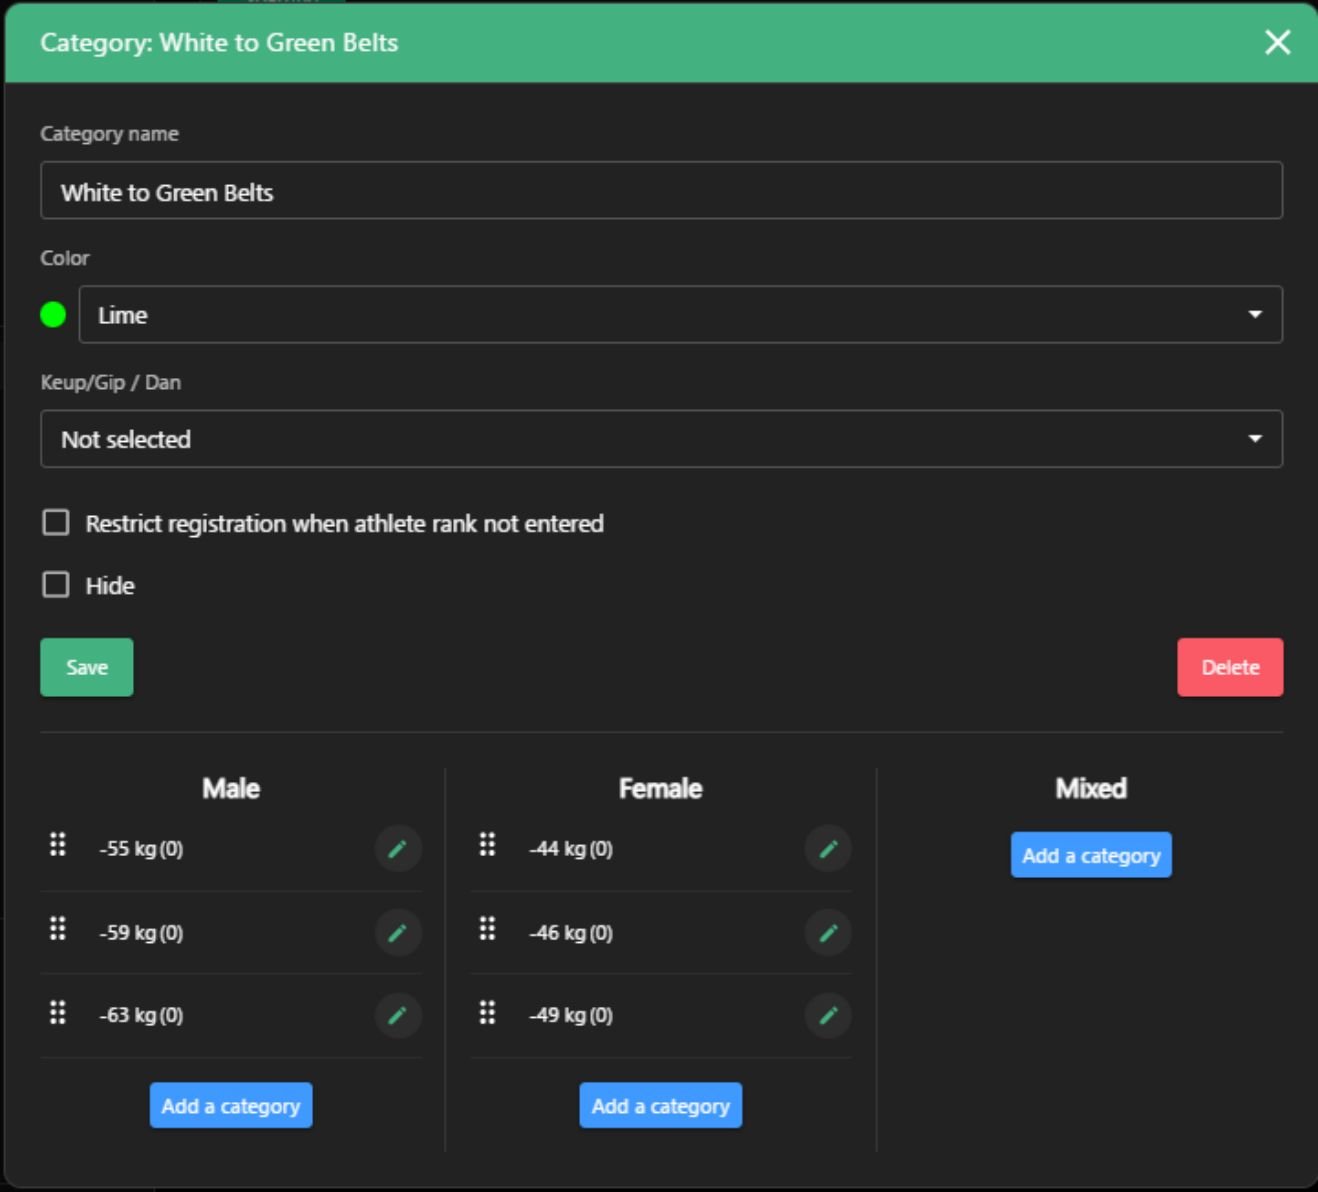
Step 4: Pro-Tip – Duplicating Categories to Save Time 💡
Weight categories are usually identical across different skill ranks. Instead of manually re-typing every weight class for a new belt division, use the Duplicate function:
In your age group dashboard view, find the ranking group you just finished configuring.
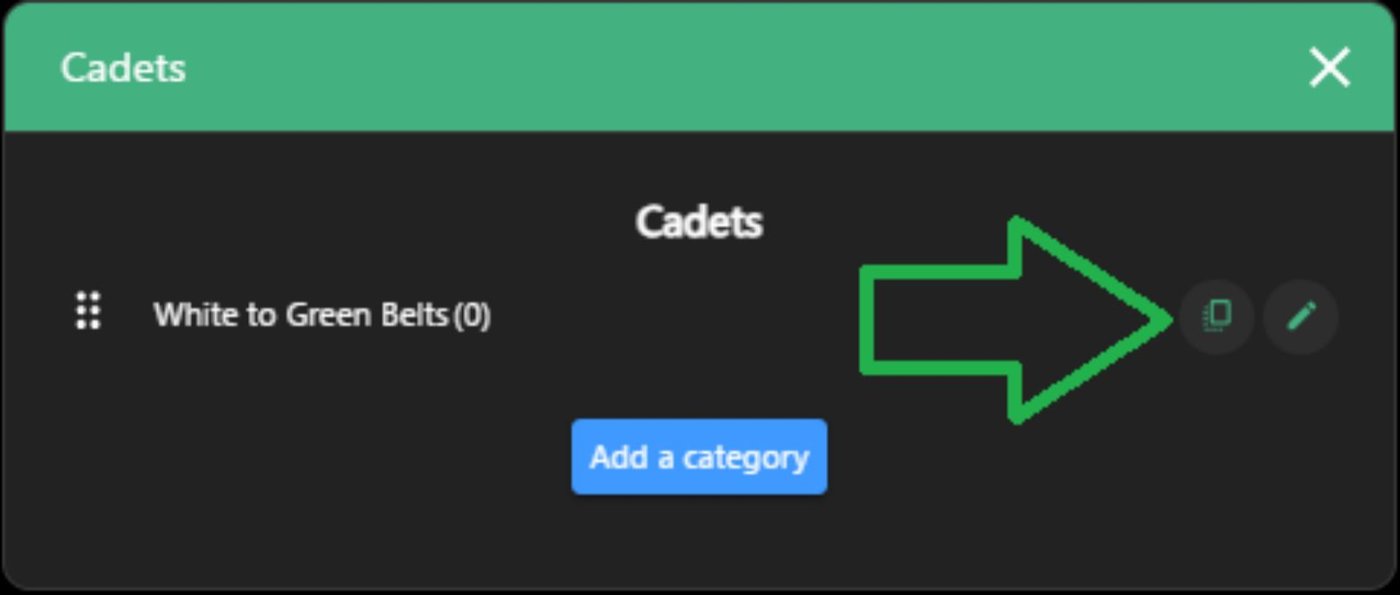
Click the icon that looks like two overlapping squares (Duplicate) right next to the edit pencil.
In the quick-edit window that appears, change the Category name to the new tier (e.g., change “White to Green Belts” to “Blue to Red Belts”).
Select the matching color from the Color dropdown menu (e.g., Red).
Click the green "Duplicate" button.
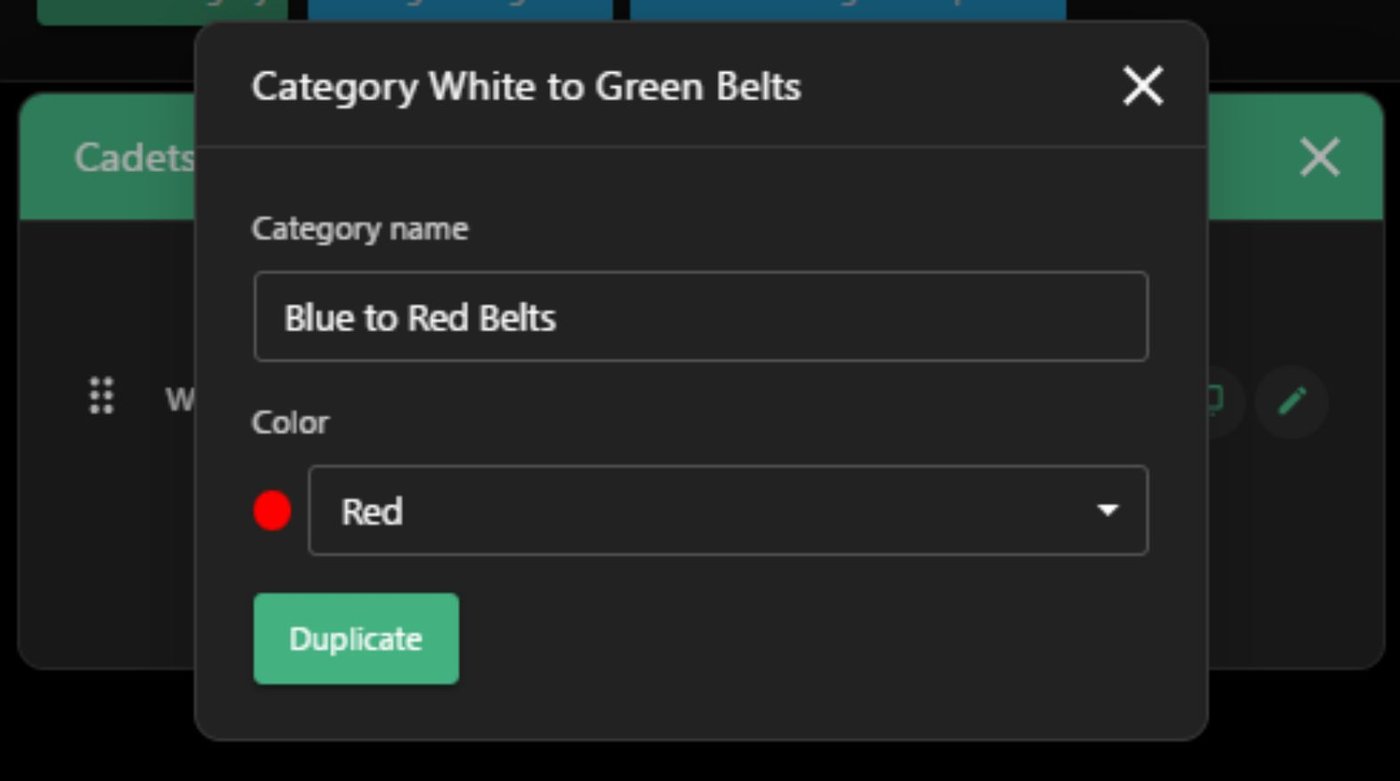
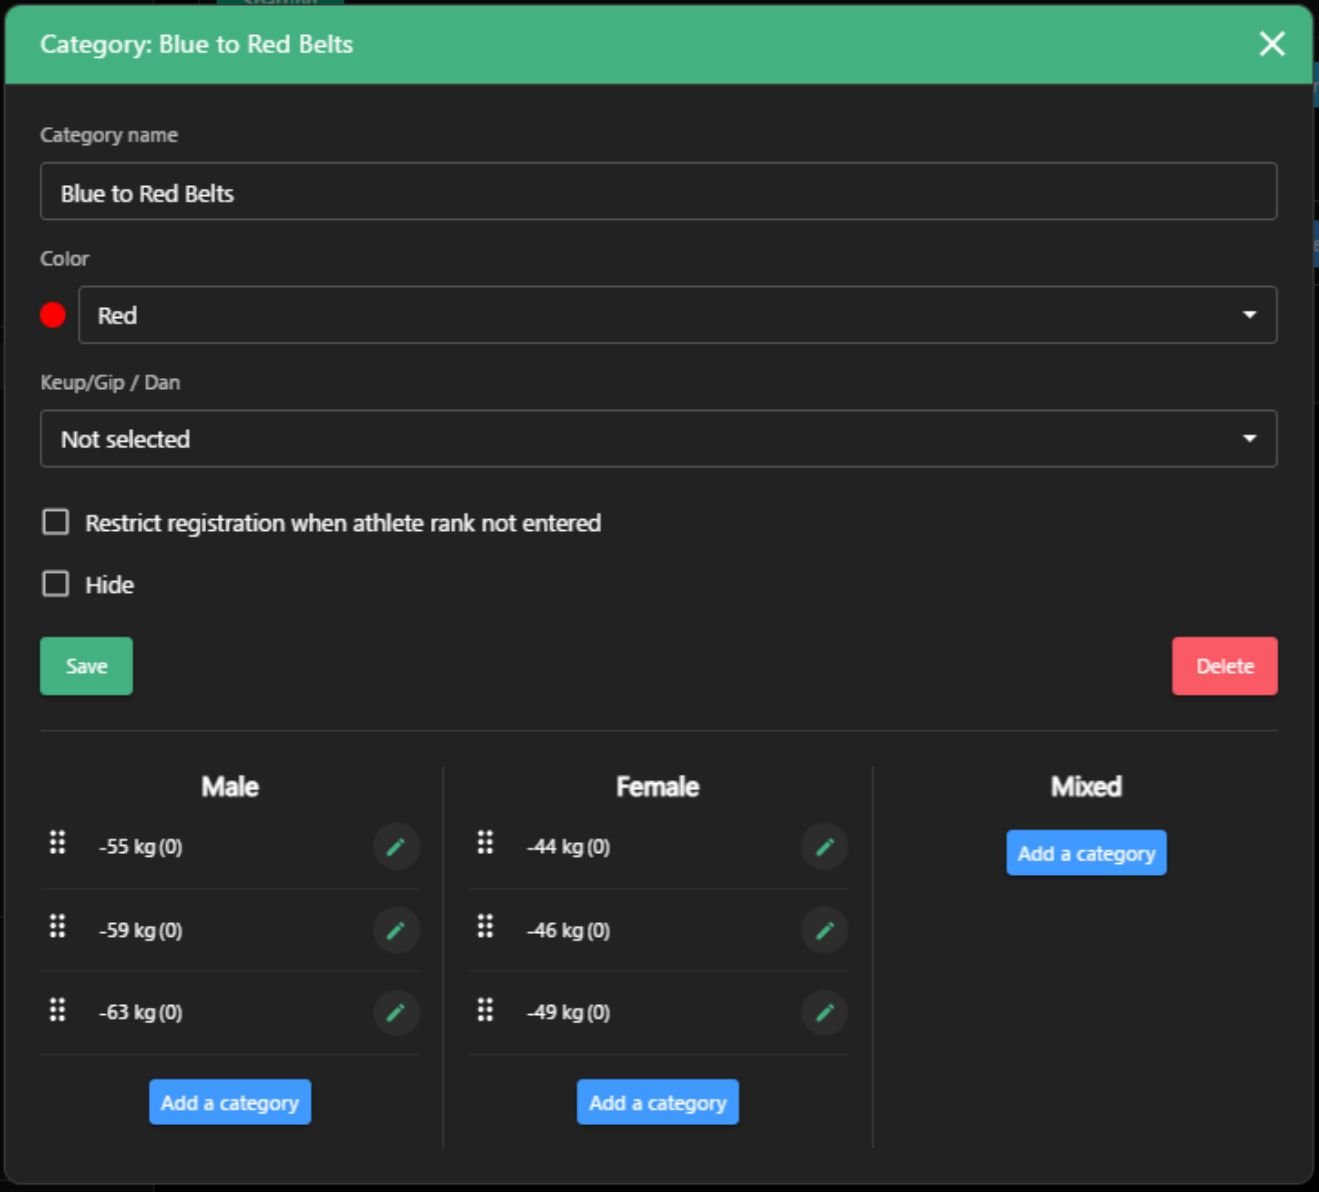
Result: A brand new rank division is created instantly, completely pre-populated with all the exact male, female, and mixed weight brackets you already configured.
Published on September 17, 2026 at 02:26 PM•88 Views